In this article, we will explain the “5 essential basic fingering techniques” in an easy-to-understand way for those who want to start playing the piano.
Scores used in the explanation video
You can download the score from the button above.
Preparation – Check the basics first!
Step 1: Learn the Finger Numbers

Finger numbers “1 to 5” are often listed on sheet music or notes.
By playing according to the finger numbers, you will naturally acquire the correct finger movements for the piano!
- Thumb
- Index finger
- Middle finger
- Ring finger
- Little finger
* Finger numbers with a circle, such as ①②, indicate that special attention is needed for techniques like “thumb under” or “finger crossing.”
Step 2: The Ideal “Hand Shape”
Imagine your hand is relaxed, as if you were sleeping.
If you place your hand gently on the keyboard in that shape, that is the ideal hand shape for playing the piano.
When playing the piano, move from the base of your fingers and play each note carefully.
5 Fingering Techniques
We’ve summarized five important fingering techniques for those touching the piano for the first time!
1: Pressing Two Notes Simultaneously
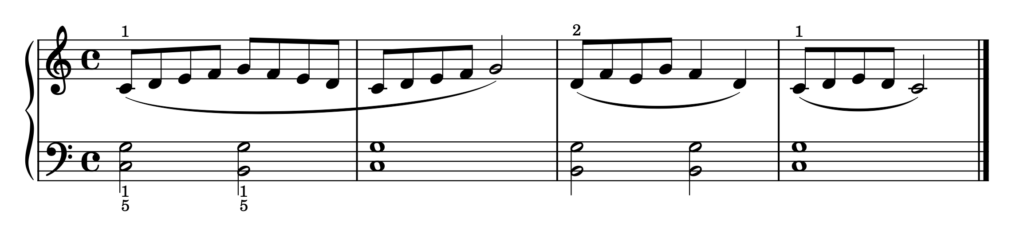
This is a way to play multiple notes at the same time.
In the video, we explain using “C and G” or “B and G” with the left hand.
Point: Be careful not to let the fingers you aren’t using (the fingers in between) go down together.
Tip: When moving to the next note, prepare by opening your hand to the next position at the same time you release the previous note. Moving your hands independently so that the right-hand melody is not cut off by the left hand is the first step toward becoming a pianist.
2: Position Changes (2 Types)
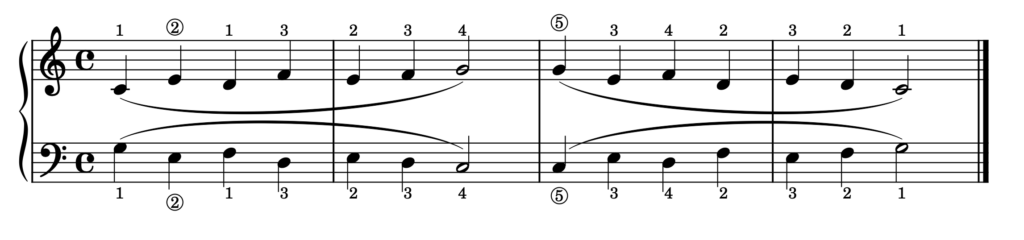
In the video, we explain two types of position changes: “expanding the gap between fingers 1 and 2 to move” and “playing the same note with a different finger.”
When movement becomes smooth, notes are less likely to be interrupted, resulting in a smooth piano performance.
3: Thumb Under and Finger Over
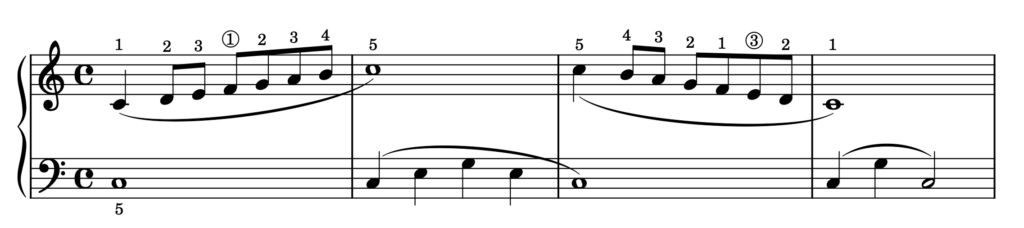
These are essential techniques for playing scales (Do, Re, Mi, Fa, So…) smoothly.
Thumb Under: A movement where the thumb passes under the middle finger or other fingers. If the middle finger (No. 3) supporting it goes down, it’s hard for the thumb to pass, so maintain a height that allows it to pass under.
Finger Over: A movement where other fingers cross over the top of the thumb. Try to be conscious of smooth connections between notes.
4: Triads
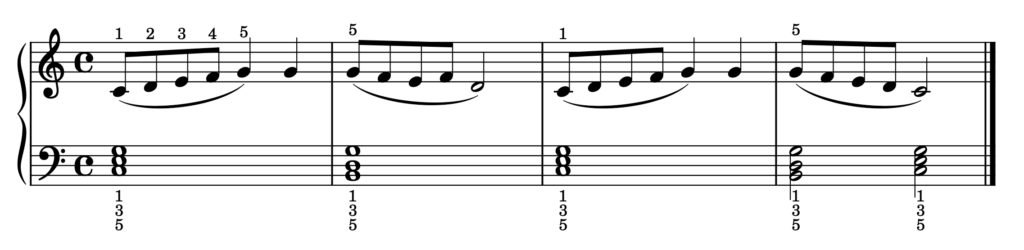
This is a technique for playing three notes at the same time.
“C, E, G” is a typical example.
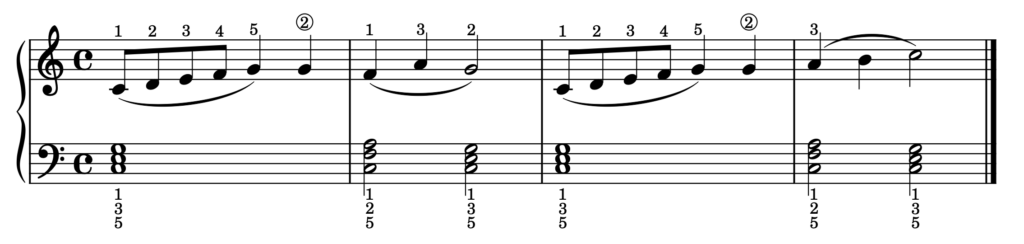
Changes in Fingering: “C, E, G” is played with fingers 5, 3, and 1, but for cases like “C, F, A,” fingers 5, 2, and 1 are used.
Caution: Fingers 2 and 3 are easy to confuse, so practice using different fingers according to the width of the keyboard is necessary.
5: Arpeggios (Broken Chords)
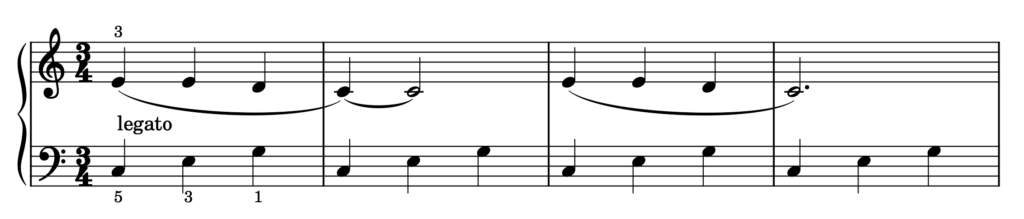
Instead of playing the chords all at once, this is a method of playing each note separately.
Effect: Using them for accompaniment creates flow and elegance in the piece.
Tip: Move fingers 5, 3, and 1 smoothly in order. Keep a constant tempo so the left-hand rhythm doesn’t become shaky, being dragged by the right hand.
Check the Lesson Content in the Video!
In this video, we explain the actual hand movements in detail. By checking it along with the explanation on this page, your understanding will deepen.
The five techniques introduced this time are the basis of all songs, so please make sure to master them.
Furthermore, in the improvement program of the VR piano game “Sigure” developed and operated by our company, it is designed so that you can naturally acquire the techniques explained this time just by playing according to the finger numbers flowing on the screen.
If you’re interested, please try incorporating VR into your piano practice!
